Monday, August 25, 2008

Organizing Branch Templates

Earlier this year, I wrote about organizing Master Hierarchies in the Sitecore content tree. I described a limitation in Sitecore 5.3 that has changed for the better in Sitecore 6. This post discusses a new Sitecore feature -- Branch Templates -- and how it has replaced and improved upon Sitecore 5.3 Masters.

The theme of Sitecore 6 was "Simplicity." In pursuit of simplicity, we made major user interface changes for content authors. Our new Page Editor and Page Designer modes dramatically improve ease of use for editors from both a content authoring and page layout perspective. In addition, we focused on simplifying the experience for developers. Many new features were added, including the Quick Action Bar, built-in validation (at both the item and field level), efficient management of locked items and much more.

The introduction of Branch Templates was a way to simplify the creation of new blueprints for complete sites, microsites or branches of the content tree. If this sounds familiar, it is because this functionality already existed in Sitecore 5.3 using Masters. Masters and Master Hierarchies were designed to create item instances of Sitecore Templates (now referred to as "Data Templates" in Sitecore 6). Masters could be configured on an individual item or on a Template's Standard Values to allow one-click item creation for non-technical business users.

Conceptually, Masters and Templates (along with their Standard Values) were so close, that we decided to merge them into a single concept in Sitecore 6. Templates became similar (and preferred to) Masters starting in Sitecore 5.3. Sitecore 5.3 introduced the idea of Template Standard Values that maintain a dynamic connection with all of the content instances (i.e. items based on the template). This was a big leap from Sitecore 5.2, where these values could only be placed on Masters. In Sitecore 5.3, we only recommend using two features of masters: 1) using Masters to create new content items and 2) using the $name token (which would be replaced with the name of the item being created).

In merging Masters and Templates, we decreased the learning curve for developers while adding some essential features. In particular, Sitecore introduced the ability to organize templates and to create Branch Templates with siblings.

Back in January, I wrote the following about the organization of Masters in Sitecore 5.3:

There are some system-related limitations to organizing masters (under /sitecore/masters). Specifically, developers cannot organize masters into subfolders...The reason for this is that Sitecore uses the structure of the masters themselves to determine master hierarchies.

In Sitecore 5.3, Masters were all stored under a flat structure under /sitecore/masters and there was no easy workaround if you wanted to organize your Masters. In multi-site solutions (or simply solutions with many masters), this was a non-ideal organizational structure.

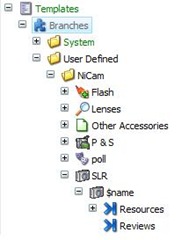
In Sitecore 6, this problem is solved using Branch Templates. You can find Branch Templates under /sitecore/templates/branches or in the Template Manager under templates/branches. In the screenshot below, you can immediately see that Branch Templates can be organized hierarchically.

Branche Template

Under the NiCam folder, you can see six branch templates: Flash, Lenses, Other Accessories, P & S, poll and SLR. The Branch Template item is a container for the template structure itself. For example, when a user creates a "Canon 200" using the "SLR" Branch Template, the following tree structure is created:

  • Cannon 200
    • Resources
    • Reviews

We can also create sibling Branches. Consider the following scenario:

image

If a user creates a "Canon 200" using the "Lenses" Branch Template, the following tree structure is created:

  • Cannon 200
  • Support
    • Resources

The idea is that you instantiate a branch using the container template (in this example, "Lenses") and Sitecore uses the children of that container to instantiate new items.

Branch Templates make life easier for developers when compared to Masters and give much more flexibility in your design of this section of the content tree. To learn more about Branch Templates, see the Data Definition Reference in the Sitecore CMS 6 References.
Tuesday, July 29, 2008

Administering Security, revisited

Back in January, I wrote about security administration in Sitecore and its effect on the design of the content tree. I advocated for the use of security inheritance to simplify security administration, such that many child or descendant items could inherit their security permissions from a single parent. Administering security on the parent item dramatically saves time over placing security settings on each of the descendants.

I also discussed the following use case:

...you may encounter requirements that a parent item and its children have different security permissions.

This is a common requirement for a product or news landing page. Someone in marketing might have editing rights to the landing page; someone in product management might have editing rights to the products themselves. One solution I recommended looked as follows:

I. Home
  a. Product Landing
    i. Products [folder]
      1. Product A
      2. Product B

This organization allows separate settings to be placed on Product Landing and the Products folder. All of the products in the branch can inherit their permissions from the Products folder. Separate permissions can be placed on the Product Landing page.

Sitecore 6 introduces a new solution to this security administration scenario. It's an exciting feature that -- while introducing some complexity -- ultimately simplifies administrative tasks. (Note: We also have new documentation on security topics on the Sitecore Developer Network. This is worth the read, as it discusses many of the new security features introduced in Sitecore 6.)

When you open the Security Editor in Sitecore 6 and select a user or role, you can click on the "Assign" button in the Editor ribbon. This brings up the Security Settings dialogue, which allows you to set separate settings for the item vs. its descendants. This directly addresses the use case above where the marketing role controls the landing page, but not the product descriptions.

Let's take a closer look at the UI. In the top pane, users and roles are listed for whom you are setting permissions. You can assign security settings for any number of users and roles at once -- a significant user interface enhancement over the Sitecore 5 approach.

In the next pane, the standard permissions (rwcrda) are listed on the left. Permissions for either the item or its descendants are listed on the right. Note that this feature has been implemented for both item-level security and item-level inheritance.

SecuritySettings

What does this mean for the design of your content tree? It means that a simplified, intuitive content tree structure can be created and easily administered. The final design for the tree can remove the Products folder without introducing administrative headaches:

I. Home
  a. Products
    i. Product A
    ii. Product B

Tuesday, March 25, 2008

Team Development

A full discussion of team development exceeds the scope of this blog; however, a brief mention of the relationship between team development and content tree design is worth mention. Typically, developers work in one of two ways: using a shared development database or a local database. In the former scenario, all changes are saved to a common system; in the latter scenario, data is changed locally and moved (using the Packager) to an integration server.

A simple rule of thumb in either scenario is to reduce the incidence of developers writing to the same item or subitems in the content tree. In the former scenario (a single development database), this can create unintended consequences due to the fact that most developers work as Administrator users. This means that common features such as item locking do not apply to them. Developers can easily overwrite each others' changes if they are working on the same part of the content tree simultaneously.

In the latter scenario (isolated development), challenges emerge when moving data to an integration server. Choosing the correct installation options in the Package Installer is often confusing and developers can end up overwriting each others’ changes.

In any case, communication and coordination between developers is essential to ensure that the data in the content tree is accurate.

Monday, March 24, 2008

Packaging Nodes

While it is typically not a first consideration to design your content structure to facilitate the creation of packages, it is worth noting that the content tree can be organized to make the difficult process of generating packages easier. Here, the simplest of recommendations applies: Organize project assets into logical folders whenever possible. For example, when managing multiple sites in a single instance of Sitecore, organize templates into site-specific folders. This makes it easy to use the "Add with Subitems" command in the Package Designer when adding items statically.

Monday, March 17, 2008

Sorting Content Items

By default, Sitecore sorts content items based on their sortorder attribute. Sortorder describes how a single content item should be sorted relative to its siblings. (If the sortorder attribute is not set, Sitecore uses the SubItems Sorting value of the parent item. See here for more information: http://sdn5.sitecore.net/Scrapbook/Understanding%20the%20Sort%20Order.aspx.) To set the sort order of an item, business users can click on the sort commands in the ribbon. The sort commands provide commonly required options:


Clicking on one of these commands updates the sortorder attribute of the selected content item:


Clicking on the sorting options allows business users to sort the subitems of the current item based on a number of criteria:


Rendering logic will implicitly recognize this sort order, such that the following rendering will respect the sortorder field:

    <xsl:for-each select="$home/item[@key='vehicles']/item">
      <sc:link>
        <sc:image field="menu image" />
        <sc:text field="menu title" />
        </sc:link>
    </xsl:for-each>

Sitecore allows developers to implement their own sorting algorithms (http://sdn5.sitecore.net/Scrapbook/Understanding%20the%20Sort%20Order.aspx). Algorithms can be specified under /sitecore/system/settings/subitems sorting. For example, to sort items by a date field, developers can use the following approach:

public class ItemComparer : IComparer
{
private string _fieldName;

public ItemComparer()
{
}

public ItemComparer(string fieldName)
{
_fieldName = fieldName;
}

public int Compare(object x, object y)
{
Item item1 = x as Item;
Item item2 = y as Item;

if (_fieldName == null)
{
_fieldName = "date";
}

Sitecore.Data.Fields.DateField date1 = (Sitecore.Data.Fields.DateField)item1.Fields[_fieldName];
Sitecore.Data.Fields.DateField date2 = (Sitecore.Data.Fields.DateField)item2.Fields[_fieldName];
return System.DateTime.Compare(date1.DateTime,
date2.DateTime);
}
}

This class can be used in your code-behind as follows:

// get an array of the Items:

Item[] i = Sitecore.Context.Database.SelectItems("");

// sort it using your comparer:

Array.Sort(i, new ItemComparer());

// use the sorted array:

foreach (Sitecore.Data.Items.Item thisItem in i) {
// do something with each item
}

Tuesday, March 11, 2008

Content Search

In some projects, developers must address requirements that involve simple searches. For example, imagine a firm that provides trainings at store locations around the local area. Each training has a predictable set of attributes such as Title, Start Date and Instructor. End users can select from a list of classes and view all of the locations where the training is being offered. Effectively, the system performs two searches: the first query returns a list of all classes; the second query returns a list of locations where a specific class is being taught. The system may provide further flexibility, wherein choosing a location lists all of the instructors teaching the class. In this case a third query will be required.


Note that here we are referring to a search of content nodes, not a website search that would typically be addressed by a site search engine. The following analysis will assume that developers are either using XPath or Sitecore Query to perform query operations.

The performance of this feature and the strategy for its implementation may be dramatically different depending on the design of the content tree. The following may be the initial design for the project, based on the logical structure of business units:

I. Home
  a. Locations
    i. Store A
      1. Classes
        a. Class A
        b. Class B
      2. About Us
    ii. Store B
      1. Classes
        a. Class A
        b. Class B
      2. About Us

This intuitive structure may easily map on to the business hierarchy, facilitate the development of navigation elements and simplify the implementation of content markers.

To query the above content structure, however, requires the use of descendants queries that may slow site performance. A Sitecore Query of /sitecore/content/home/locations//*[@@templatename=’class’] would return a result set including all classes; however, the system would have to traverse almost the entire content tree to access the desired results. Similarly, a Sitecore Query of locations that teach the selected class would require an additional descendants search along with further analysis of content items to determine available locations.

The larger the number of locations, the slower the queries will perform. The SDN provides guidance on optimizing the performance of various query scenarios (http://sdn5.sitecore.net/Reference/Using%20Sitecore%20Query.aspx); however, in this case, a reorganization of the content tree may be in order. Consider the following alternative:

I. Global
  a. Classes
    i. Class A
      1. Instance A
      2. Instance B
    ii. Class B
II. Home
  a. Locations
    i. Store A
      1. About Us

Here, the classes are organized under /sitecore/content/Global/Classes. Each class has any number of instances, which include attributes for Start Date, Instructor and Location. With this organizational approach, the queries are simplified and provide significance performance advantages. A query of /sitecore/ content/Global/Classes/* will return a list of classes without requiring a descendants query. Retrieving a list of locations for a particular class, again, avoids descendants queries. The query /sitecore/content/Global/Classes/Class A/* will return all class Instances for a particular Class. This list of Classes will need to be analyzed to generate a list of locations.

Optimizing the content tree for search performance is a broad topic and exceeds the scope of this document. However, developers should keep this consideration in mind when designing the content tree. Other approaches – such as leveraging the Links Database, creating search metadata or using search engine APIs – should also be considered fully when optimizing search-driven features.

Wednesday, March 5, 2008

Navigation Elements

The design of your content tree can dramatically impact the ease of implementing navigation elements such as hierarchical navigation or breadcrumbs.

When the content tree mirrors the information architecture of your web site, generating hierarchical navigation is extremely simple. An XSL code snippet could be as straightforward as the following:

  <xsl:for-each select="$home/item[@template='section']">
    <div>
      <sc:link>
        <sc:text field="menu title" />
      </sc:link>
    </div>
  </xsl:for-each>

In this simple example, the XSLT loops through the children of the home item and outputs a link to each child that is based on the Section template. The simplicity of this rendering is dependent upon the mirroring of the content tree and the information architecture of the site. When possible, this is a very desirable way to design the content hierarchy due to the development productivities that can be realized.

Depending upon what should appear in the site navigation, however, this exact mirroring may not be possible. Business users may want to control the items listed in the navigation based on editorial decisions rather than a static information architecture. Consider a requirement for the following items to appear in the navigation: Specials, CEO Blog, Products and About Us. These items, however, may be scattered throughout the content tree:

I. Home
  a. Products
    i. Specials
    ii. Product A
  b. About Us
    i. CEO Blog

There is no simple logic to determine which items will appear in the navigation and – even if there were – this logic may change over time. To address this, developers may wish to allow business users to configure the navigation themselves. One way to accomplish this requires that the navigation is described in metadata items, possibly in the /sitecore/content/global folder.

I. Content
  a. Global
    i. Navigation
      1. Nav 1
      2. Nav 2
      3. Nav 3
      4. Nav 4

Each of the Nav elements in the above example is based on a template with a Navigation Item field. This field may be a tree list control that allows business users to select an arbitrary item from the content tree. Business users may sort the children of /content/global/navigation in the order they should appear in the navigation. A simple rendering would be:

  <xsl:for-each select="/*/item[@key='content']/item[@key='global']/item[@key='navigation']/item">
    <div>
      <xsl:variable name="sourceItem" select="sc:item(sc:fld('navigation item', .), .)" />
      <sc:link select="$sourceItem">
        <sc:text field="menu title" select="$sourceItem" />
      </sc:link>
    </div>
  </xsl:for-each>

A perhaps simpler approach (though more complex in XSL) would be to implement a single Navigation item:
I. Content
  a. Global
    i. Navigation

The Navigation item would have a field called “Menu Items” of type treelist whose source is the /sitecore/content/home item. Business users can choose which items they want to appear in the navigation and sort them based on editorial decisions.

Yet another way to tackle this problem would be to create a base template for your site with a “Show in Navigation” field. Your rendering logic could perform a descendants query starting with the home item to check for the value of the field. While the solution is simple, this query could create extreme overhead problems as descendants queries can be very expensive.

Rendering breadcrumbs poses similar challenges to those described with hierarchical navigation. When the page navigation mirrors the content tree, rendering breadcrumbs is trivial from a coding perspective:

  <xsl:for-each select="ancestor::item">
    <xsl:if test="position() > 2">
      <sc:link>
        <sc:text field="menu title" />
      </sc:link> >
    </xsl:if>
  </xsl:for-each>
  <sc:text field="menu title" />

If the user has navigated to the /sitecore/content/Home/Products item, the above rendering will output: Home > Products.

When the content tree does not mirror the information architecture of the website, breadcrumbs become more complicated. Imagine the following content hierarchy:

I. Home
  a. News
    i. 2007
      1. January
      2. February
        a. 01
          i. News Story 1
          ii. News Story 2

In the example above, News Stories are structured by the year, month and date they are entered. However, business requirements may dictate that the breadcrumb exclude the year, month and date items and display all News Stories as children of the News section. For example, the breadcrumb for News Story 1 should be: Home > News > News Story 1. To implement this, a simple filtering of content items by template may be sufficient:

  <xsl:for-each select="ancestor::item">
    <xsl:if test="position() > 2 and @template != 'folder'">
      <sc:link>
        <sc:text field="menu title" />
      </sc:link> >
    </xsl:if>
  </xsl:for-each>
  <sc:text field="menu title" />

The more your content tree deviates from your site’s information architecture, the more complex your rendering logic will need to be and the more reliant your renderings will be on metadata. This should not imply that your content tree needs to be determined by ease-of-coding considerations. However, where developer productivities can be achieved by simplifying content organization, this should be considered.

Thursday, February 28, 2008

Deleting or Renaming the Home Item

When beginning a new project, developers sometimes delete the /sitecore/content/Home item in the spirit of "starting from scratch." While this impulse makes sense, it should be avoided in the case of the Home item. Sitecore uses the Home item for system-related features and configuration changes are required if the Home item is deleted or renamed: http://sdn5.sitecore.net/Articles/Administration/Configuring%20Multiple%20Sites/Adding%20New%20Site/Internal%20Links/Case%201.aspx

If you would like to rename your Home item, an easier solution may be to simply change its Display Name. To do this, click on the Home item, then select Display Name in the Rename chunk.

Wednesday, February 27, 2008

Hiding and Protecting Items

If business users are logging in to the Content Editor, confusion may ensue. Sitecore provides the “Hide Item” and “Protect Item” features to reduce confusion and prevent accidental errors.

Hiding items prevents items from appearing in the content tree (if “Hidden Items” is unchecked in the View chunk). To hide an item (or an entire branch), click on the item, then click “Hide Item” in the Attributes chunk on the Configure tab. Note that only users in the Sitecore Client Configuring role can access this functionality.


Once an item is hidden, it can be unhidden using the following steps:
  • Check “Hidden Items” in the View chunk.
  • Click on the hidden item in the content tree.
  • Click “Make Item Visible” in the attributes chunk.

Protecting items prevents anyone from modifying a content item (unless they first unprotect it). The intention of protecting items is to prevent the accidental deletion of system functionality. Imagine, for example, the possibility of accidentally deleting the /sitecore/system section of the content tree. This would cause major problems for Sitecore’s functioning and should be avoided at all costs. To reduce the chances of this kind of error, many Sitecore nodes are protected by default. Protected nodes cannot be modified – even by Administrators – without first being unprotected.

When navigating to a protected item, users will be alerted:


Administrators or users belonging to Sitecore Client Configuring may unprotect items by clicking “Unprotect Item” in the Attributes chunk:

Tuesday, February 26, 2008

Using Security to Simplify the User Experience

In general, Sitecore recommends that business users and power users access WebEdit mode to the greatest degree possible. For a variety of reasons, however, this may not always be possible. Administrators, for example, may prefer sorting from within the Content Editor rather than in WebEdit mode. Additionally, content authors may need to edit content items for which no content markers have been created (such as look-up values, for example).

In these cases it may be worthwhile to use security permissions to limit what appears in the content tree (see also “Hiding and Protecting Items,” the subject of a future blog posting). One way to accomplish this is to deny read access to branches of the content tree for particular users. In a multi-site scenario, this may mean denying read permissions to Site A for the content authors of Site B. The end result would be that when a Site B author logs in to the Content Editor, they do not see Site A at all. This may reduce confusion and clutter in the content tree for the content author.

The weakness of this approach is that content items for which a user does not have read access do not appear in the rich text editor when a user is creating a Sitecore link. In other words, a user cannot create a managed link to a content item for which the user does not have read permissions. This applies to lookup, multilist, tree, treelist and checklist fields as well.

Thursday, February 21, 2008

Formatting the Content Tree

Any item in the content tree may have special formatting applied to it. The most common example of this is to bold the root item for a site:


You may apply a variety of possible CSS styles to content items to affect their appearance in the content tree. For example:


To configure the appearance of a content item, click on the content item and select Tree Node Style in the Appearance chunk. Sitecore will present a form that allows you to enter any number of CSS styles (separated by a semicolon):


While this feature can be useful, its overuse may cause confusion for business users.

Tuesday, February 19, 2008

Display Names

Display names provide an alternate name for content items when they are rendered in the Content Editor or the item editor (in WebEdit mode). In the following example, Home has a display name of “Sitecore.net”:


There are a number of scenarios where this feature may be useful. Sometimes, the name of a content item is insufficiently descriptive for developer- or business-user ease-of-use. For example, the standard Sitecore installation comes with an item called “Home.” To enhance the user interface experience, you may want to rename the Home item to something else. It is easy to rename an item; however, if you have already created dependencies on the Home item, renaming may cause problems if performed late in a project. (See also “Deleting or Renaming the Home Item,” the subject of a future blog post.)


In other situations, you may want to create an item with an illegal character (such as an exclamation mark). While the item name must not include illegal characters (as this would interfere with the processing of http requests), the Display Name can include characters that are not allowed in item names.


To set the display name for a content item, navigate to the item in the Content Editor and click the Display Name command in the Rename chunk:


Thursday, February 14, 2008

Massive Branches

For medium- to large- sites, customers may have large amounts of content based on the same template. For example, a news site may have hundreds of thousands of news stories or a product site may have tens of thousands of products. From a performance perspective, Sitecore will have no problem handling this volume of content; however, the organization of the content will impact system performance (see here for more information: http://sdn5.sitecore.net/Articles/Administration/Sitecore%20Performance/Storage/Deep%20vs%20Shallow%20Trees.aspx). Additionally, the business user or developer experience may suffer in certain circumstances. Consider the following:

I. Home
  a. News
    i. News Story 1
    ii. News Story 2
    iii. …
    iv. News Story 130,001
    v. News Story 130,002
    vi. …

Expanding the News node in the Content Editor would cause serious performance issues from a user-interface perspective. Sitecore would attempt to return the content structure for 100,000+ content items and the web browser may be pushed to its limits in terms of memory usage or CPU. Further, if the News item were used as the datasource for a multilist or lookup control, business users would face a difficult challenge locating content items from a list of this size.

To address this issue, some kind of organizational structure is required. Items may be organized by:

  • Year, month and date
  • Author
  • Alphabet (i.e. an “A” folder, a “B” folder, etc.)
  • Category and subcategory

Whatever organizational approach you choose, select one that will scale as content volume increases. The above content tree, for example, could be organized as follows:

I. Home
  a. News
    i. 2007
      1. 1
        a. 1
          i) News Story 1
          ii) News Story 2
        b. 2
          i) News Story 1

In this example, news stories are organized by year, month and date. The strength of this approach is that it provides a comprehensible hierarchy that easily scales over time. The challenge of this approach is that WebEdit mode will require customizations in order to add new News Stories. When a business user adds a News Story, programmatic logic will be required to ensure that the news story is created in the appropriate folder or subfolder.

Sometimes no obvious organization scheme presents itself. In these cases, an arbitrary content structure may be required to ensure that the content tree remains usable. For example:

I. Home
  a. News
    i. Folder 1
      1. News Stories 1-50
        i) News Story 1
        ii) …
      2. News Stories 51-100
        i) News Story 51
      3. …
      4. New Stories 2,451-2,500
    ii. Folder 2
      1. News Stories 2,501-2,550
      2. …

This approach provides an organizational structure for otherwise hard-to-structure content and ensures that no single branch of the content tree will overwhelm the user interface. The weakness of this approach is that the non-semantic nature of the folders and subfolders may weaken search engine optimization strategies that rely on URL paths for content categorization. It will also be difficult to locate items within the Sitecore UI itself without using the built-in search tool.

Finally, remember that this issue should only be of concern to developers and power users from a user interface perspective. Business users working with WebEdit mode will never use the Content Editor and, as such, will never be exposed to the content tree per se. If you are considering allowing business users to access the Content Editor, remember the potential confusion this may cause as the content tree becomes more complex.

Thursday, February 7, 2008

Search Engine Optimization

Search engine optimization is a critical aspect of site design. While its complexity far exceeds the scope of this blog, it is worth mentioning as it regards the design of the content tree.

Two rules of thumb are useful here: 1) Search engines attribute semantic weight to content hierarchy and 2) Shallow structures may be more optimal than deep structures.

Addressing point 1), a search engine will treat /Products/Shirts/Men/Knit.aspx as more semantically rich than /Foo/Foo/Foo.aspx. Each level in the hierarchy is considered significant when interpreting the meaning and categorization of the link. Fortunately, Sitecore is designed to facilitate this kind of content organization; Sitecore’s “friendly-URLs” allow for search-engine friendly paths.

Regarding point 2), content in shallow branches may be deemed more significant than content in deeper branches. For example /Products/Shirts.aspx may be considered more relevant to a site than /Products/Shirts/Men/Knit.aspx. Most of the time, the need for content organization may trump this consideration. However, addressing categorization through metadata may be an alternative to expressing categorization through hierarchy.

Tuesday, February 5, 2008

Wildcard Nodes

There may be scenarios where you want to create “catch-all” nodes in your content tree, i.e. if the request doesn’t find a match, apply some default processing. In Sitecore, these are referred to as “wildcard” nodes. To create a wildcard node, add a content item named “*”:
I. Home
  a. Products
    i. *
    ii. Product A

When a request comes in for /Products/Product A.aspx, Sitecore will find the /sitecore/content/Home/Products/Product A content item. If a request comes in for /Products/Product B.aspx, Sitecore will find the /sitecore/content/Home/Products/* content item.

Wildcards may also be nested, for example:
I. Home
  a. Products
    i. *
      1. *
    ii. Product A

In this case, a request for /Products/Product B/Attribute 1.aspx will be a match for the /sitecore/content/Home/Products/*/* item in the content tree.There are varied uses of this feature. The following article describes how to use this feature to embed query string values in URLs: http://larsnielsen.blogspirit.com/archive/2007/01/09/sitecore-avoiding-query-string-in-dynamic-url.html.

Monday, February 4, 2008

Aliases and Marketing URLs

Sitecore supports the concept of an alias, a short URL that can provides an alternate and easier way to navigate to a content item deep in the content tree. For information about configuring aliases, see here: http://sdn5.sitecore.net/Articles/Administration/Aliases.aspx.

Aliases impact the content tree in that they implicitly create items in the content tree. For example, a business user can create an alias /Product A.aspx that points to an item deep in the content tree, such as /Products/Category A/Subcategory A/Product A.aspx. Implicitly, a new node under the root of the site has been created. Business users should be careful to avoid explicitly creating content items that duplicate aliases, as unexpected behavior will occur.

There are at least a few limitations to aliases: 1) aliases must always end in “.aspx” and, as such, may not be usable for marketing purposes and 2) aliases can only be children of the site root – the UI for adding aliases prevents users from creating deeper aliases, such as /Featured Products/Products.aspx. The greatest utility of aliases may be for email marketing, where lengthy urls in plain-text messages may be truncated by email programs.

Marketing URLs are a more flexible form of aliases. See here for more information: (http://sdn5.sitecore.net/Scrapbook/Friendlier%20Marketing%20URLs.aspx). Marketing URLs are handled by URL rewriting tools such as ISAPI_Rewrite. Marketing URLs do not need to end in .aspx and can be as deep as you like. Marketing URLs can be mapped to their proper Sitecore friendly url. Other solutions for marketing URLs also exist (such as including logic in your 404 page) and are beyond the scope of this document. The point in mentioning marketing URLs is to provide potentially more useful alternative to aliases that will generally not complicate the administration of your content tree.

Friday, February 1, 2008

Including Data from External Sources and Legacy Applications

Data Providers
Sitecore abstracts its data access using a data provider model. In brief, a data provider is like an interface that – if implemented fully – allows Sitecore to “plug in” to any database or other content repository. Due to the complexity of implementing a complete data provider, it is a strongly discouraged practice. There are almost always preferable alternatives which vary depending on whether your primary requirement centers on presentation, data entry or both.

We discuss the topic briefly here as developers may find occasion to implement simple, read-only data providers and because some Sitecore modules (such as the Sitecore Sharepoint Module) may leverage this architecture. In any case, data providers are rendered in the content tree and warrant mention here for that reason alone. Considerations around how to design a data provider, i.e. represent relational data hierarchically, is considered outside of scope for this document.

Data from data providers can be viewed by switching databases using the database chooser located in the lower right-hand corner of the Sitecore taskbar. Clicking on the database icon allows developers to view any of the seven standard Sitecore databases as well as any additional data providers that have been defined for the Sitecore instance. Opening the content editor will represent the data from the data provider in a familiar hierarchical view.

To represent this data within the master database, developers typically create proxy items. See the discussion above on proxy items and reference items for more information.

Legacy Applications
Another approach to integrating external data into Sitecore is relying on legacy applications that may have presentation components. Often, it is desirable for these components to be served from the same web root. In other words, /Products.aspx and /Profiles.aspx may co-exist under the same web root; however, Products.aspx is served by Sitecore while Profiles.aspx is handled by a legacy application. The standard solution for this requirement is to configure the IgnoreUrlPrefixes setting in the web.config. IgnoreUrlPrefixes allows developers to indicate that requests for certain files or directories should be ignored by Sitecore’s processors.

While this doesn’t explicitly affect the design of the content tree, it implicitly does. Any path specified in IgnoreUrlPrefixes will never be a valid Sitecore path (unless the value for the setting is changed); in other words, the system will never try to resolve the item to an actual content item. Content editors will need to be aware of these excluded paths or file names to ensure they do not create content items with identical names.

Wednesday, January 30, 2008

Proxy Items and Reference Items

Proxy items in Sitecore are, loosely speaking, pointers to source content items located elsewhere in the content tree. Editing a proxy item updates the source item and vice-versa. To create a proxy item, consult the documentation provided on the SDN (http://sdn5.sitecore.net/Articles/Administration/Using%20Proxy%20Items%20in%205,-d-,3/What%20is%20a%20Proxy%20Item.aspx). Note that using proxy items may have performance impacts and the documentation should be consulted closely before using this approach. Additionally, requirements should be carefully analyzed and prototyped to ensure that proxy items provide a complete solution.

Developers sometimes envision proxy items as a solution for content sharing:

I. Sitecore
  a. Content
    i. Site A
      1. Content Item A
    ii. Site B
      1. Proxy of Content Item A

While this may initially appear to be an ideal solution, at least one major problem presents itself – proxy items cannot have unique presentation settings. In other words, the proxied content item will use the same presentation settings (i.e. layout, sublayouts and renderings) as are applied to the source content item. In this case, even though the proxied item is in Site B, it will be rendered in the same manner as the source item in Site A. While it may be possible to work around this – for example by implementing a pipeline processor – this approach may become complex quickly, particularly if you deploy many proxy items.

The most common use of proxy items is for lookup values that do not require presentation settings and may, in fact, be located in different databases. Consider, for example, a requirement that business users be able to associate a content item (perhaps a site or a major branch of a site) with particular users or roles. This metadata may be used to drive email notifications within workflow actions. The Security database (containing user and role information for content authors) may be proxied to a global folder in the main content tree. For example:

I. Content
  a. Global
    i. Users
      1. User A
      2. User B
  b. Home
    i. Content Item A

Content Item A may have a multilist field whose source is /sitecore/content/Global/Users.

Another instance of using proxy items is in proxying data sourced from an external data provider. The Sitecore Sharepoint Module uses this approach. Sitecore allows Sharepoint document libraries or lists to appear as proxy items in the Media Library or elsewhere in the content tree.

"Reference items" are a simpler, but in some ways more complete, approach to referencing other content items. A reference item is an item whose template has at least one field that references another content item. Consider the following template design:

Product
TitleText
DescriptionRich Text
Reference ItemReference


The reference field type provides a tree control that allows users to choose any item in the content tree to which they have read access.

The advantages to using reference items are at least two fold: 1) Presentation settings can be placed on reference items completely independently of the item referenced and 2) Fields in the reference item can – through presentation logic – implicitly override the same fields in the source item. Some disadvantages to using reference items are: 1) Presentation logic becomes more complicated, 2) The concept of referencing other content items may be confusing to business users and 3) Dependencies are created between content items. Presentation logic will be required to handle unforeseen scenarios (such as the deletion of the source item). When using this approach, consider pre-populating the reference fields in template standard values to simplify the configuration for business users.

Monday, January 28, 2008

Multiple Sites

In Sitecore, a "site" is just another content item in the content tree. Using configuration settings in the web.config, you can associate a <site> with, for example, a hostName (i.e. mysite.com), a startItem (i.e. /sitecore/content/mysite) and many other settings which are described in the web.config. Configuring multi-site solutions is described on the Sitecore Developer Network (SDN) (http://sdn5.sitecore.net/Articles/Administration/Configuring%20Multiple%20Sites.aspx). Sitecore also provides a user interface for configuring multi-site solutions that may be appropriate for certain environments (http://sdn5.sitecore.net/SDN5/Resources/Shared%20Source/Modules/Multiple%20Sites%20Manager.aspx).

A representative content tree may look like this:
1. Sitecore
  a. Content
    i. Site A
    ii. Site B
    iii. Site n

When managing large numbers of sites with a single instance of Sitecore, consider creating an organizational structure for your sites. This is discussed in greater detail in the "Massive Branches" section of this blog.

It exceeds the scope of this posting to fully discuss the benefits and pitfalls of managing multiple sites with a single instance of Sitecore. Suffice it to say that there are many important considerations to take into account. Most of these considerations do not affect the organization of the content tree and, as such, are not discussed herein. The reader is encouraged to consult the SDN or an experienced solution partner prior to implementing a multi-site solution.

A common requirement in creating multi-site solutions is to share content between sites. There are several approaches to this requirement:

1. Reference global items.
2. Copy items.
3. Use proxy items or reference items.

In the first approach, referencing global items, create a global folder at the same level as your sites:

1. Sitecore
  a. Content
    i. Global Content
    ii. Site A
    iii. Site B
    iv. Site n

Under the Global Content item, include all of the items that are used across sites. Examples may include a privacy policy, legal notices, a mission statement, or an entire branch of content that will be mirrored in your other sites. The advantage to this approach is content reuse – i.e. global content can be updated in one location and changes will be reflected on all sites that reference the content.

In the second approach, items are copied from one site (or from the Global Content folder) to another site. The advantages here are simplicity and transparency – the global content items are essentially starting points or stub items that take on a life of their own once copied. The primary disadvantage is the loss of content reuse. An additional disadvantage is that a power user will most likely be required to copy a branch from the source to the target location, an operation outside of the scope of typical business user activities.

The third approach, using proxy items or reference items, will discussed in my next blog entry.

Thursday, January 24, 2008

Master Hierarchies

The topic of creating master hierarchies (i.e. default subitems) is covered at length in the Sitecore Certified Developer 1 training and in the Sitecore Developer Cookbook: http://sdn5.sitecore.net/Developer/Developers%20Cookbook.aspx.

Master hierarchies allow business users to create entire branches of a content tree through the same process used to create a normal content item. Consider a case where product descriptions are divided into four logical subjects, displayed on separate (or the same) web pages:

I. Home
  a. Products
    i. Product A
      1. Product Features
      2. Detailed Specifications
      3. Pricing Information
      4. Order Information

Rather than having business users manually create four sub-items for every new product, developers should create master hierarchies to automatically create the child items as well as the Product itself.

There are some system-related limitations to organizing masters (under /sitecore/masters). Specifically, developers cannot organize masters into subfolders. For example, ideally your masters could be organized thus:

I. Sitecore
  a. Masters
    i. Site A
      1. Master A
      2. Master B
    ii. Site B
      1. Master A
      2. Master B

Unfortunately, this arrangement is unsupported. The reason for this is that Sitecore uses the structure of the masters themselves to determine master hierarchies. In the structure above, Sitecore assumes that Site A is a master hierarchy with child masters Master A and Master B. Sitecore will not interpret Site A and Site B as organizing items (even if, for example, they are based on the Folder template). A possible approach to organizing masters, then, may be to rely on naming conventions, such as:

I. Sitecore
  a. Masters
    i. SiteA_MasterA
    ii. SiteA_MasterB
    iii. SiteB_MasterA
    iv. SiteB_MasterB

A shortcoming – and potentially a major one – of this approach is that it produces masters with non-business-user-friendly names. In other words, when business users right-click on a content marker, they will see the site prefix on each master. This may cause confusion and require additional training. A workaround for this is to change the display name of the master and that name -- rather than the actual name of the master -- will be displayed in the UI.

Keep in mind that read permissions can be placed on masters so that users only see masters in the UI that are relevant for their content creation purposes.

Tuesday, January 22, 2008

Publishing Considerations

Publishing Considerations
As of Sitecore 5.3.1, the system does not have an out-of-the-box approach for publishing dependent items. Consider the following content structure:

I. Home
  a. Promotions
    i. Promotion A
II. Global
  a. Legal
    i. Legal Notice A
    ii. Legal Notice B

Imagine that every promotion has a multilist field (with a source of /sitecore/content/Global/Legal) wherein a business user can choose which Legal Notices should be applied to a Promotion. This will work fine in WebEdit mode. When the promotion is published (for example, through a workflow action), there is no guarantee that all of the required legal notices will also get published. If a business user has associated Promotion A with Legal Notice B, both of these items will need to get published in order to present all of the required Legal Notices for the Promotion. This will happen without additional effort if the site is published using an incremental publish (assuming the Legal Notice is in a final workflow state).

If you are using the AutoPublish workflow action, you can organize your content tree to address these dependent items:

I. Home
  a. Promotions
    i. Promotion A
      1. Legal Notice A
      2. Legal Notice B

When you use the AutoPublish action, Promotion A and all of its children will get published (again, assuming that the Legal Notices are in final workflow states or not part of a workflow). Note that the AutoPublish action requires the “deep=1” parameter in order to publish child items.

This solution will not be appropriate for many requirements. For example, if Legal Notices are reused across Promotions, it does not make sense to have them be child items of individual Promotions (as this defeats content reuse). Also, if Legal Notices go through a workflow process independent of promotions, there is no guarantee that the Legal Notices will get published when the Promotion gets published.

To address publishing dependencies, you may need to rely on a scheduled task or a more complex workflow action to publish rather than using out-of-the-box workflow-based publishing.

Wednesday, January 16, 2008

Administering Security

Ideally, security should be administered on as few content items as possible. For ease of administration, developers should endeavor to apply security to high-level items and use inheritance to determine security for child items. It is optimal if you can administer security on just a few content items in a site with thousands of total items.

This is preferred to setting security on individual content items on an ad hoc basis. In an ad hoc scenario, large-scale changes to security permissions are impossible without scripting or manual updates.

This suggests several possible configurations for your site. In the following example, the content tree is designed for ease of extranet administration:

I. Home
  a. Products
  b. About Us
  c. Secure
    i. Secure Content Item A
    ii. Secure Content Item B

Here, all content that requires extranet login is stored under the Secure node. Administration of the site for extranet users is reduced to editing security settings on a single node, i.e. Secure.

Adding Sitecore security (i.e. for content authors and editors) may complicate things. Imagine, for example, that there are multiple categories of secure items which are edited by different roles. In this case, your content tree should be optimized for both Extranet and Sitecore domain administration:

I. Home
  a. Products
  b. About Us
  c. Secure
    i. Secure Category A
      1. Secure Content Item A
    ii. Secure Category B
      1. Secure Content Item A

In this example, extranet security is still administered on the “Secure” node, while Sitecore security is administered on the “Secure Category A” and “Secure Category B” nodes.

Consider the following additional complication: you may encounter requirements that a parent item and its children have different security requirements. Imagine in the following example that one set of permissions applies to the Products landing page and another set of permissions apply to the products themselves:

I. Home
  a. Products
    i. Product A
    ii. Product B

We can imagine that the Product Manager role is allowed to edit product descriptions themselves, but the Marketing role is allowed to edit the Products landing page. If the products are all set to inherit their permissions, they will effectively be inheriting the Marketing permissions. This can be remedied by setting permissions on each individual Product, in the Product master or in the template standard values. The most flexible solution among the three is to set the security settings on the template standard values. This prevents security settings from being placed on individual content items, which poses the greatest administrative challenge.

Another option is to create an additional sub-item, perhaps based on the Folder template:

I. Home
  a. Product Landing
    i. Products [folder]
      1. Product A
      2. Product B

Security in this case can be administered on the Products item, with separate security permissions placed on the Product Landing item.

In some cases, it becomes difficult to follow this security administration model. For example, imagine a scenario with four possible roles, any combination of which could be applied to a single content item. Specific security permissions may be entirely driven by editorial decisions. In these cases you may need to resort to masters, templates or security presets to manage entirely ad hoc security permissions.

Tuesday, January 15, 2008

Metadata Child Items

In order to achieve flexibility in the design of your site, you may store metadata items as children of a primary content item. End users typically navigate only to primary content items, while the child metadata items may drive the presentation of the content or other aspects of the end-user experience.

Consider a requirement for business users to add any number of sidebar items to a web page. For purposes of simplicity, imagine that a sidebar item contains two fields: a title, and a link (i.e. a field that points to another Sitecore item). To address this requirement, your content tree may look something like this:

I. Article A
  a. Sidebar Item 1
  b. Sidebar Item n
II. Article B
  a. Sidebar Item 1
  b. Sidebar Item n
III. …

If business users can edit both a left and a right sidebar, your content tree may appear thus:

I. Article A
  a. Left Sidebar
    i. Sidebar Item 1
    ii. Sidebar Item n
  b. Right Sidebar
    i. Sidebar Item 1
    ii. Sidebar Item n

The benefit of this approach is that business users can add unlimited amounts of metadata (in this case, metadata that drives presentation logic) to each content item. The weaknesses of this approach are at least three-fold:
  1. The Content Editor becomes increasingly complex and, as such, may be confusing to users who access it.
  2. Non-technical business users will require more training to understand how to use content markers in WebEdit mode. In the example above, each web page will have several content markers, i.e. one for the content item itself and one for each of the sidebars.
  3. Sorting becomes complicated. Business users can sort the sidebar items up and down using the sort commands in the item editor; but WebEdit mode lacks a Content Editor-style visualization of the sorting. This is not unique to the metadata child items scenario, but may decrease usability in an already usability-challenged implementation.
Even given these limitations, there are times where using metadata child items is the best possible solution.

Friday, January 11, 2008

Media Library and Layout Organization

In general, the same considerations apply to Media Library or Layout items as apply to any other content item. The goal in either of these cases is to organize items in a way that makes sense to business users (in the case of the Media Library) or developers (in the case of Layout items). Media items are sometimes organized based on the type of asset (i.e. image, word document, pdf, etc.) or an asset’s classification (i.e. product images, home page images, navigation images, etc.).

Keep in mind the ability to set the source attribute of an image field. The source attribute describes where in the media library business users will start browsing when they populate an image field. Organizing your media library to facilitate business user navigation of the media library will enhance the usability of the system.

While Media Library items are typically organized based on business user usability concerns, the organization of layouts, sublayouts and renderings is driven by developer considerations (in addition to the other considerations described in this document). Developers may organize code assets by site, local vs. global or by a logical ordering. When organizing presentation objects, remember that files and metadata are managed separately (i.e. on the file system vs. as Sitecore items). The organization of the files and Sitecore items typically mirror each other, but do not have to.

Note that layouts, sublayouts and renderings may be stored in virtual directories (virtual applications are not supported) to facilitate code management and source control.

Tuesday, January 8, 2008

Multiple Fields, Child Items or Global Items?

Certain content types may have repeating fields. For example, on your public website, every product may be displayed with three accessories. One way to address this requirement is to include fields in your template for each of your accessories. Imagine a template with the following structure:

Product
TitleText
Description Rich Text
Accessory One Rich Text
Accessory Two Rich Text
Accessory ThreeRich Text


The advantage of using this kind of template structure is that business users will find it easy to enter content. Clicking on a single content marker will allow them to update both the product and its accessories. Ease-of-use should not be underestimated as a benefit to this approach.

There are at least two shortcomings of the approach: 1) If the number of accessories varies per product, business users will need to enter the accessory information in the appropriate fields and ignore unused fields. If the number of accessories for products increases beyond three, the template will need to be modified to add an “Accessory Four” field. 2) The reusability of the data is limited. If two products reference the same accessory, the accessory description will have to be entered twice (i.e., once for each product).

One solution would be to create a structure of products and child accessories. Consider, for example, the following solution:

I. Products
  a. Product One
    i. Accessory A
    ii. Accessory B
    iii. Accessory C
  b. Product Two
    i. Accessory A
II. …

The content is structured to allow n accessories per product. Some products may have one accessory, while others may have ten. When business users create new products, the product master will be configured to create the appropriate number of subitems.

There are several weaknesses to this approach: 1) More work will be required of business users to edit the accessories, i.e. there will be one content marker for the product and additional content markers for each accessory. 2) Deleting a product necessarily deletes its accessories, which may or may not be desirable. 3) While the solution allows the business user to create any number of accessories, the content structure is not easily reusable. In particular, if a requirement exists to render a list of all accessories, your code would need to traverse the products section of the site, looking for content items that are based on the Accessory template. In simple circumstances this may not cause problems. If accessories are distributed throughout the site, however, this query would need to traverse all possible nodes where accessories may be descendants. This would introduce some complexity and possibly impact performance.

Yet another approach would be to list all accessories in a global area and reference those in the Product template. In this case, the product template may look like this:

Product
TitleText
DescriptionRich Text
AccessoriesMultilist /sitecore/content/home/accessories


Business users will create new products and then select the appropriate accessories from the multilist control. The strength of this approach is that the accessories are easily-reusable content and the business user experience is straightforward.

The weakness of this approach is that it assumes that accessories are pre-entered under /sitecore/content/home/accessories. In other words, if an accessory doesn’t exist yet, there is no way to select it in the multilist control. For business users to create or edit accessories, they will run into similar difficulties as in the child-items scenario (i.e. more clicks to create both a product and its accessories). If accessories themselves are treated in the same way as other products, this may not be a serious issue, i.e. accessories must be created as products regardless of whether they are related to an already-existing product. In any case, items must be created before dependent relationships can be asserted. This can complicate the business user experience but may be addressable through training.

Monday, January 7, 2008

Defining Taxonomies and Look-Ups

Every Sitecore implementation will require content branches that define content taxonomies and/or look-up values. Often, these branches will be placed in a Global folder at the same level as your Home item. Within the Global folder, your metadata values can be organized based on existing taxonomies or structured to facilitate the use of look-up controls (i.e. lookup, multilist, tree, etc.). For example:

I. Home
  a. Products
  b. About Us
II. Global
  a. Market Segments
    i. Age
      1. 18-25
      2. 26-30
    ii. Frequency
      1. This month
      2. Past 6 months
  b. Taxonomy
    i. …

Why put the Global folder at the same level as your Home item? The idea here is that end users (i.e. public visitors to your website) will never navigate to the Global items. The items in the Global folder will typically not have presentation settings and will sometimes be based on very simple templates. The values in the Global folder can be accessed within the UI (for example, as a data source for a lookup control) or within your presentation logic.
This approach works for many scenarios where developers need to create a data source for lookup fields. Sometimes, however, you may want users to navigate to content items that also serve as metadata sources. Consider the following:

I. Home
  a. Products
    i. Summer 2007
      1. Product A
    ii. Fall 2007
  b. …
II. Global
  a. Market Segments
    i. Age
      1. …

A content item based on the Product template may have an Age Segment field and a Season field. The source for the Age Segment field could be /sitecore/content/Global/Market Segments/Age while the source for the Season field could be /sitecore/content/Home/Products. The product seasons are both content items that an end-user can navigate to as well as a data source for the Season field within a Product item.

Friday, January 4, 2008

Architectural Considerations: Leveraging Your Information Architecture

A common approach to designing the content tree is to mirror the information architecture (IA) of your website. For example, your site’s information architecture may look like this:


I. Home
  a. Products
    i. Shirts
      1. Men
      2. Women
    ii. Pants
      1. Men
      2. Women
  b. Account Management
  c. About Us
  d. Legal
  e. …

In this case, your information architecture includes a product catalog that organizes content first by the type of apparel (“Shirts,” “Pants”) and then by subcategory (“Men,” Women”). A first pass at developing your content tree might look exactly like your information architecture. When business users add a new men’s shirt, they will add it under /sitecore/content/Home/Products/Shirts/Men.

This is an extremely common approach to building the content hierarchy, and has at least a couple of advantages:

  • Presentation elements such as breadcrumbs and navigation can be easily driven from the content structure.
  • Simplicity and transparency; when the content tree and the IA are in synch, it is easy to understand the relationship between the two.

In addition to the above, this is a common approach because it leverages the work you have already done in defining the information architecture of your website. Through this approach, you are able to describe relationship through hierarchy. In other words, I know a product is a men’s shirt because it appears under Shirts > Men.

The limitations of this approach come up when the site implements a faceted navigation scheme (see http://en.wikipedia.org/wiki/Faceted_classification for more information). The consequence of faceted navigation is that individual content items may be displayed in multiple sections of the site. Consider the following information architecture:

I. Home
  a. Products
    i. Shirts
      1. Men
      2. Women
    ii. Pants
      1. Men
      2. Women
    iii. Men
      1. Shirts
      2. Pants
    iv. Women
      1. Shirts
      2. Pants

Here, a men’s shirt could appear under Home > Products > Shirts > Men or Home > Products > Men > Shirts.

Even though it will appear in multiple places on the site, we don’t want business users to have to enter the content twice in the content tree. To this end, we need to define a content tree that is structured differently from the information architecture. In this case, we will define a content hierarchy that organizes products by season.

I. Home
  a. Products
    i. Summer 2007
      1. Product 1
      2. Product 2
      3. …
    ii. Fall 2007
    iii. Winter 2007
    iv. Spring 2008

Note that the content tree now looks completely different from the information architecture. Why organize products by season? This may or may not be the correct organizational heuristic, but the point remains: developers will need to create a logical content structure of some sort in the content tree. The structure of the tree in this scenario will be largely determined by other considerations.

Even in faceted schemes, developers may take a hybrid approach. While the “Products” section of the tree may be organized independently of the IA, the rest of the content tree may more closely follow the IA. Another hybrid approach could involve a mix of the IA and the faceted classification within the products section:

I. Home
  a. Products
    i. Men
      1. Summer 2007
        a. Product 1
        b. Product 2
      2. Fall 2007
    ii. Women
      1. Summer 2007
      2. Fall 2007

There could be a number of reasons for choosing this organizational approach, such as ease of generating navigation elements, security considerations or publishing considerations. There could also be considerations here that are completely independent of Sitecore – you might choose a structure that mirrors your content taxonomy, reflects your business processes, enhances developer convenience or simply makes sense within the context of your organization.

When your content tree does not mirror your IA, your rendering logic must be more complex. But that is for a future post...

Thursday, January 3, 2008

The Basics of Sitecore's Content Tree

The content tree in Sitecore provides a hierarchical view of system data. Each node in the tree is referred to as a “content item” and can contain any number of content versions in any number of languages. A typical Sitecore instance stores data in a relational database (such as SQL Server or Oracle); Sitecore represents the data in memory as an XML structure. The content tree is a visualization of that structure.

This blog describes a number of considerations involved in designing the content tree. These considerations are divided into four major categories: 1) Architectural, 2) User-Interface, 3) Presentation and 4) Development. Architectural considerations address issues that are fundamental to the structure of the content tree, i.e. determining the basic organizational framework for site content. User-interface considerations explore how the organization of the content impacts the functioning of the Sitecore business-user interfaces. Presentation considerations address how the organization of the content tree affects developers’ ability to retrieve and render data from the system. Development considerations address how the content tree structure can simplify or complicate the development process.

Typically, the design of the content tree is considered early on in the project – after your information architecture and content taxonomies have been developed, but before any C# or XSL coding occurs. The following requirement areas will ultimately inform the shape of your content tree and should be understood during the content tree design phase:
  • Information architecture of your website in all its presentation formats (browser, RSS, etc.)
  • Content taxonomies and business rules about their use
  • Major navigation metaphors for your site (i.e. hierarchical or faceted navigation, breadcrumb, sitemap, etc.)
  • Content volume upon launch and over time
  • Security rules for business users and public visitors to your site
  • Number of sites managed within a single Sitecore instance

You may not have complete detail on all of the above requirement areas prior to designing your content tree. The less detail you have, the more iteration will be required through the design. As with any solution architecture component, you should budget time to test your design against various requirements, known and (to the degree possible) unknown.

Prior to designing the content tree, you have begun work on your template model. Your template model describes the content types on your site and their relationships to each other. Template modeling is beyond scope for this document, but it is likely that your template model will evolve in dialogue with the design of your content tree.

To view the content tree in Sitecore, use the Content Editor application. There are two audiences for Content Editor – developers and power users. For developers, Content Editor is the primary tool used for editing and adding Sitecore content. Power users may also use Content Editor to facilitate quick editing, sorting or to make changes that aren’t available in WebEdit mode.

In general, business users and power users should be directed to WebEdit mode for all content changes. If business users or power users are using Content Editor, usability considerations will heavily come into play in the design of your content tree. These usability concerns are not discussed in this blog and instead, Sitecore recommends that business users and power users be directed to WebEdit mode.

Taxonomy and Hierarchy in Web Content Management

Welcome to my blog on taxonomy and hierarchy in web content management! The focus of this blog will be on designing the content tree in Sitecore CMS.

Why focus on designing the content hierarchy? The content tree is the backbone of your Sitecore solution and will fundamentally determine the ease-of-use, flexibility and scalability of your project. For new Sitecore developers, desigining the content tree can be a daunting task. Because best practices in the design of the content tree are project-specific, there is little general advice to be found on the Sitecore Developer Network or through other resources.

I'll try to post frequently to this blog to help navigate the waters of this critical aspect of your Sitecore project.